Making your own e-paper dashboard for home from scratch!
In this post, I describe the complete setup I used to create my epaper and raspberry pi based dashboard running on node.


In the few coming minutes, you will read about epaper screens, raspberry pi, node, web components, tailwindcss, open-wc, netlify and more :).
This article is quite long so for once I'll create a few pointers with TL;DR every time :)
- The hardware
- -> the screen
- -> the computer
- -> the OS
- The software
- -> the 'backend'
- -> the frontend
- Some remarks
It's the second time I create a dashboard for my house. We are working hard on reducing our carbon emissions. Tracking energy usage as well as making food plans is a very good way to do just that.
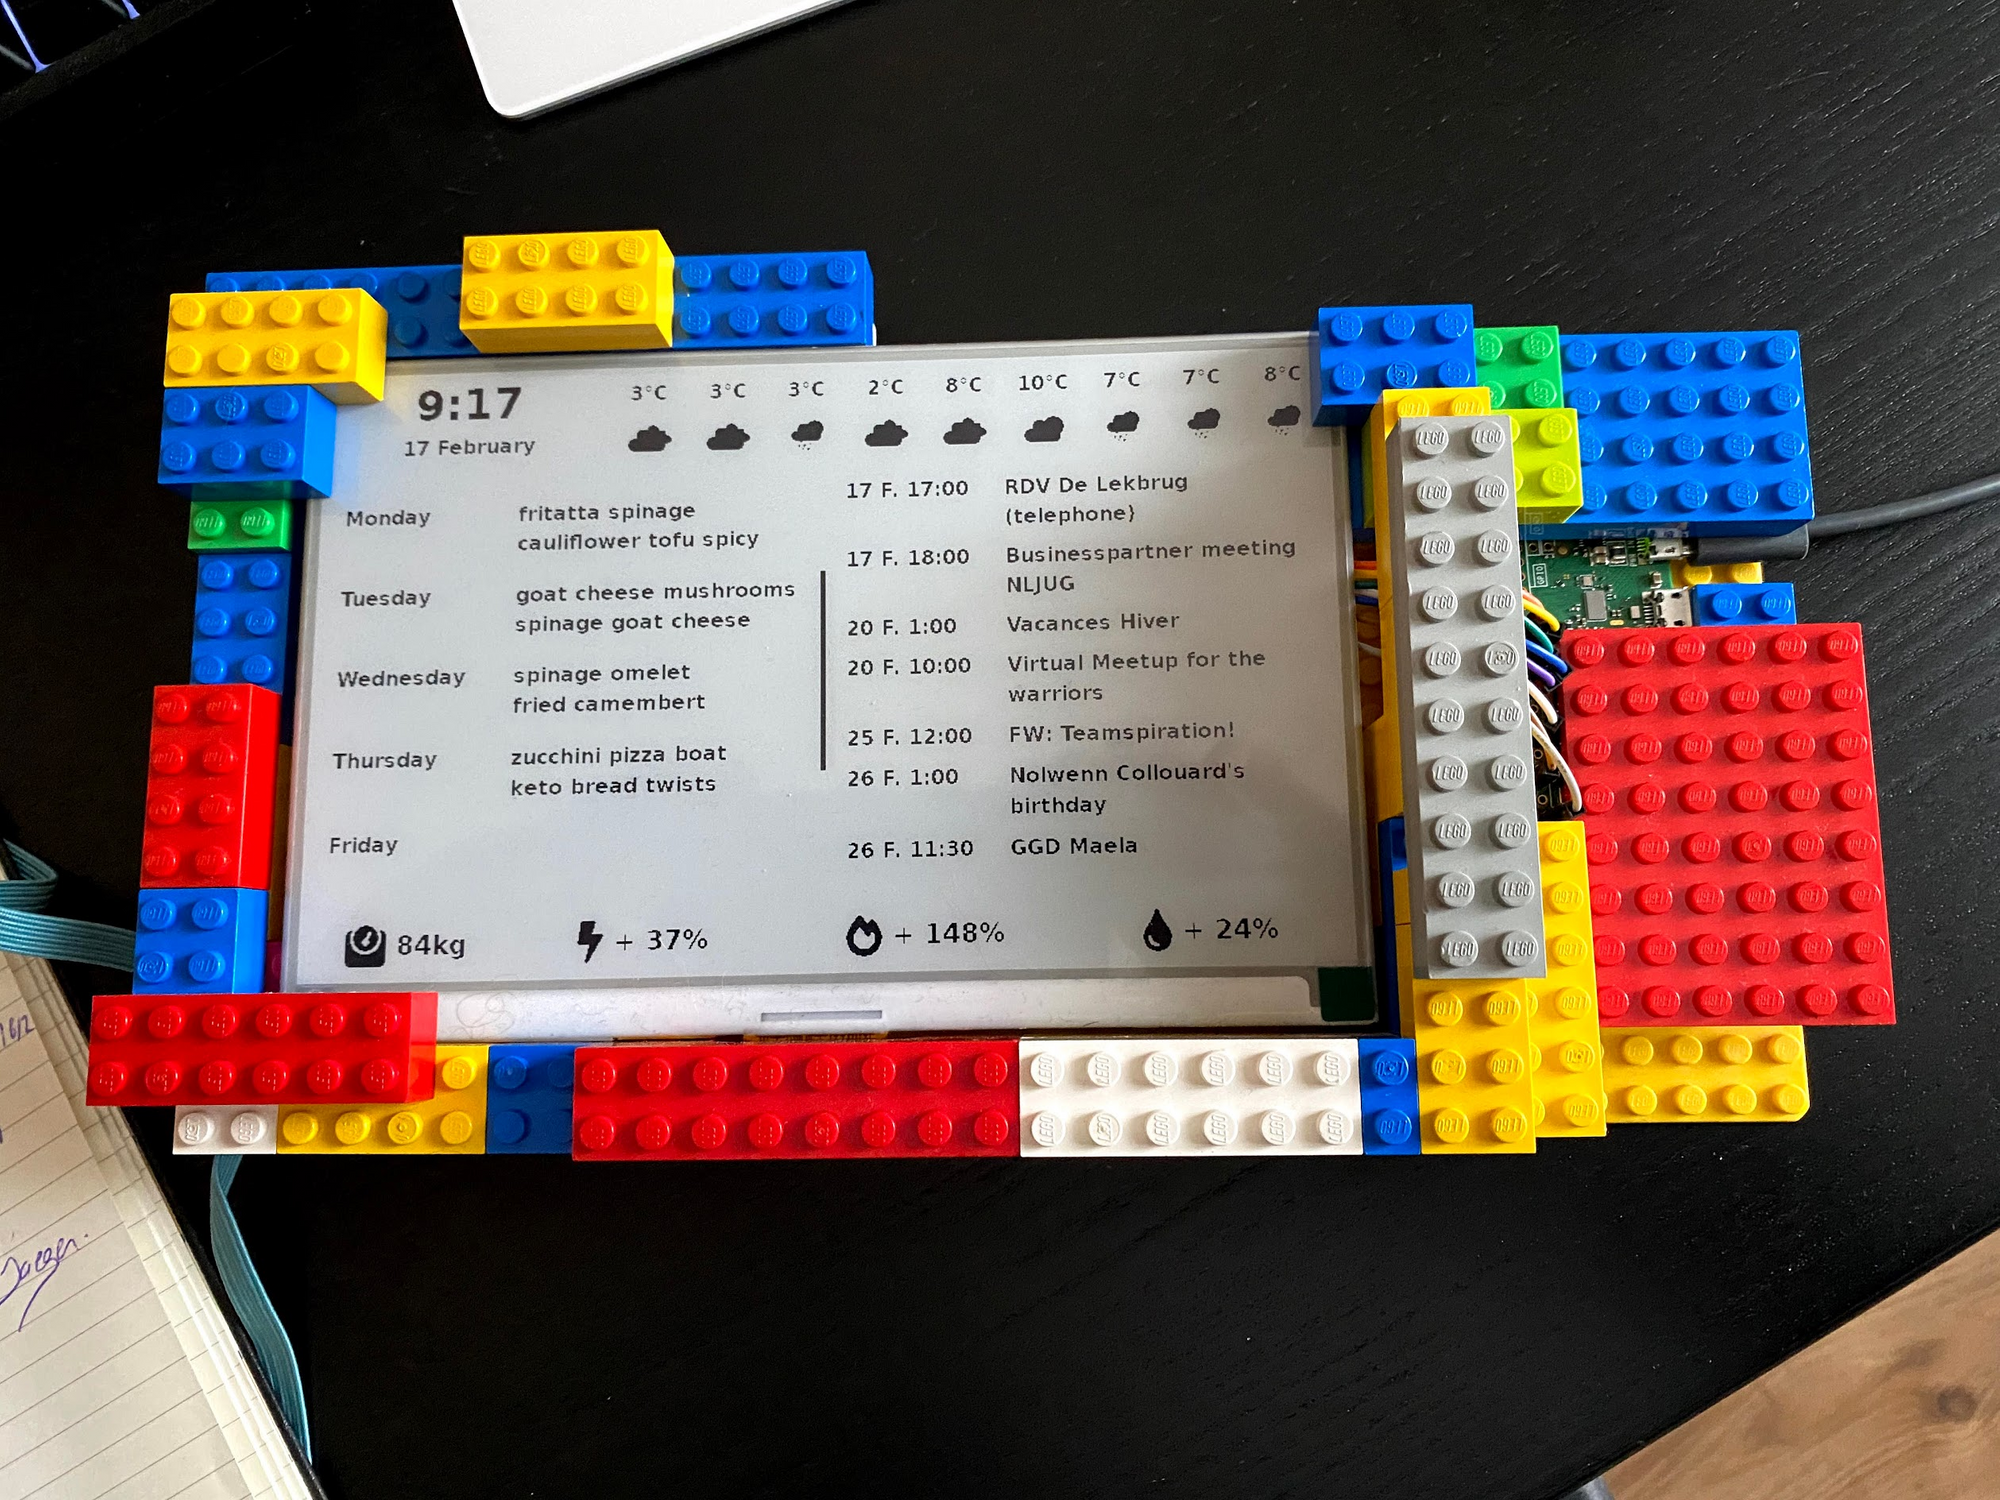
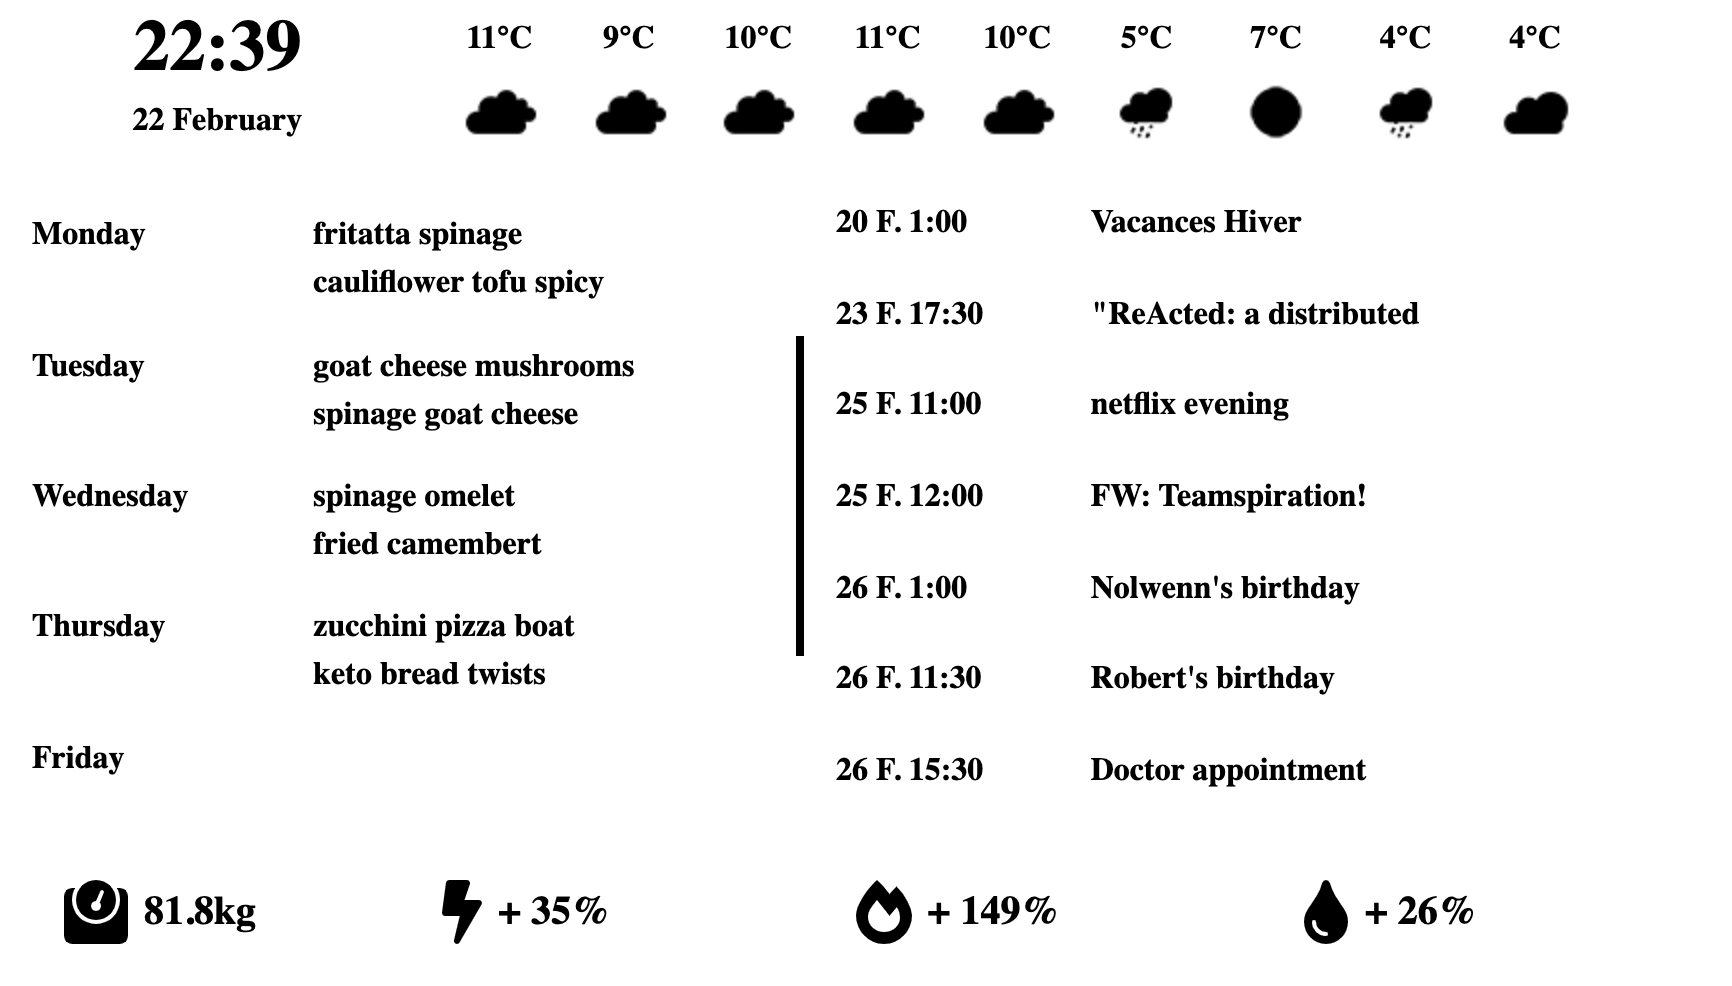
This time, I wanted my dashboard to be built with an e-paper screen, to avoid the ugly backlight of a tablet, and reduce energy consumption. Here is the final product :
In this post, I'll tell you all about how it's built, and how you can do it too. I won't describe everything, but point you to relevant documentations I followed. I'll also share tips and tricks.
The hardware!
TL;DR: Get a Waveshare screen, a Raspberry Pi and follow instructions.
As any good physical product, everything starts with the hardware :). If you want to build the same dashboard, you'll need:
Total is about 70€, everything included.
The screen
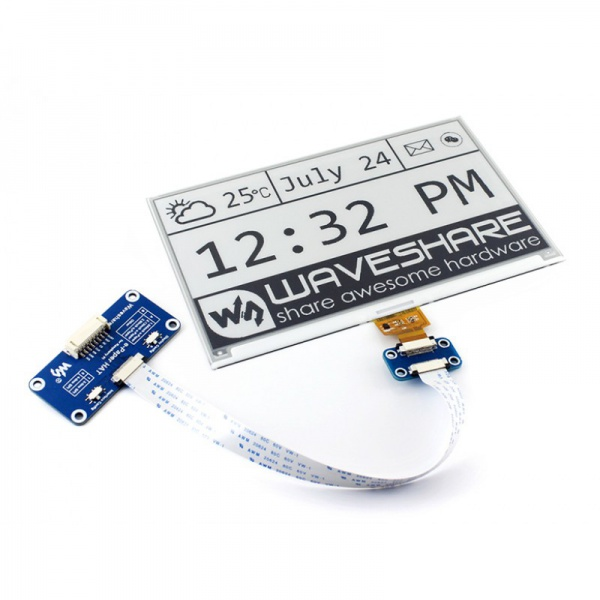
I am using this 7.5 inch 2 colors screen from Waveshare. My initial plan was to go for a 9.7inch with gray levels, but I had no experience at all with that hardware so I went for the safer, 50$, solution.
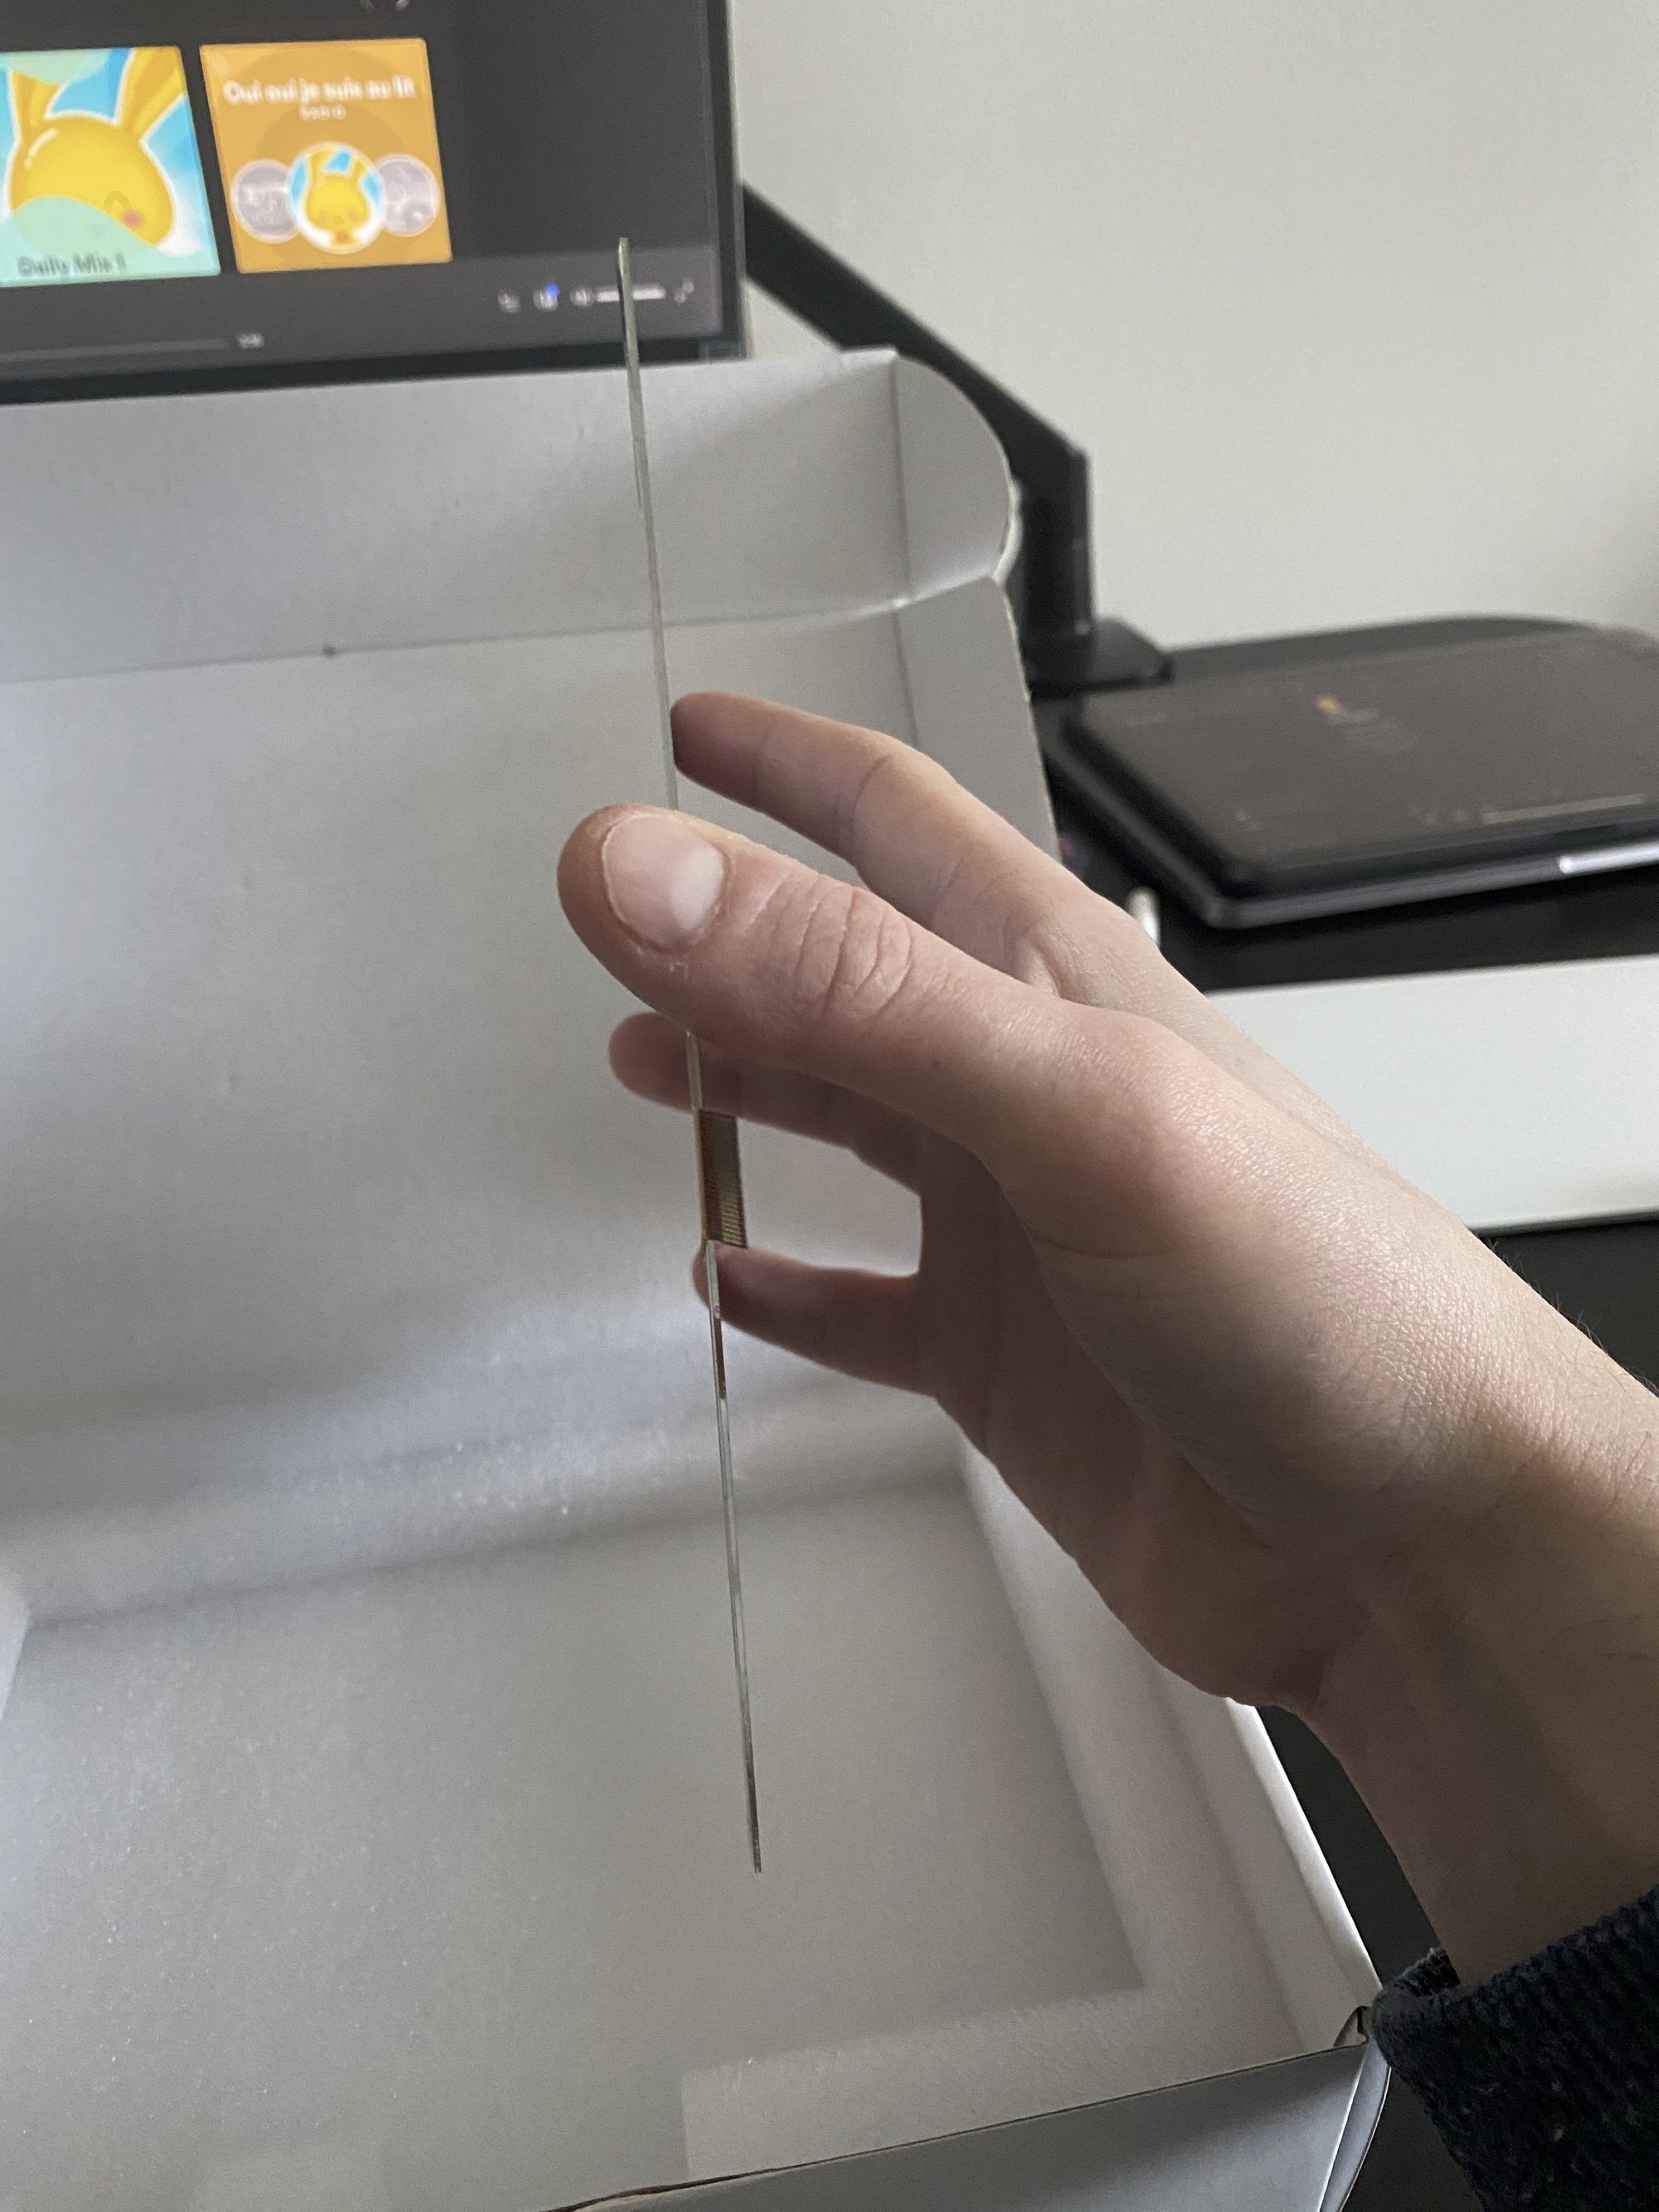
The first good news is that the screen is CRAZY thin, here is a photo to give you an idea :
When buying an e-paper screen, here are the things you want to look for :
- Refresh time. One of the cons of having an e-ink screen is that refreshes usually take a while. If you want performance, also look whether partial refreshes are available. Here is a video of mine so you get an idea:
It updates every 5 minutes and that's what a refresh looks like in case you wonder : pic.twitter.com/PjW4CS4rXp
— Julien Lengrand-Lambert (@jlengrand) February 18, 2021
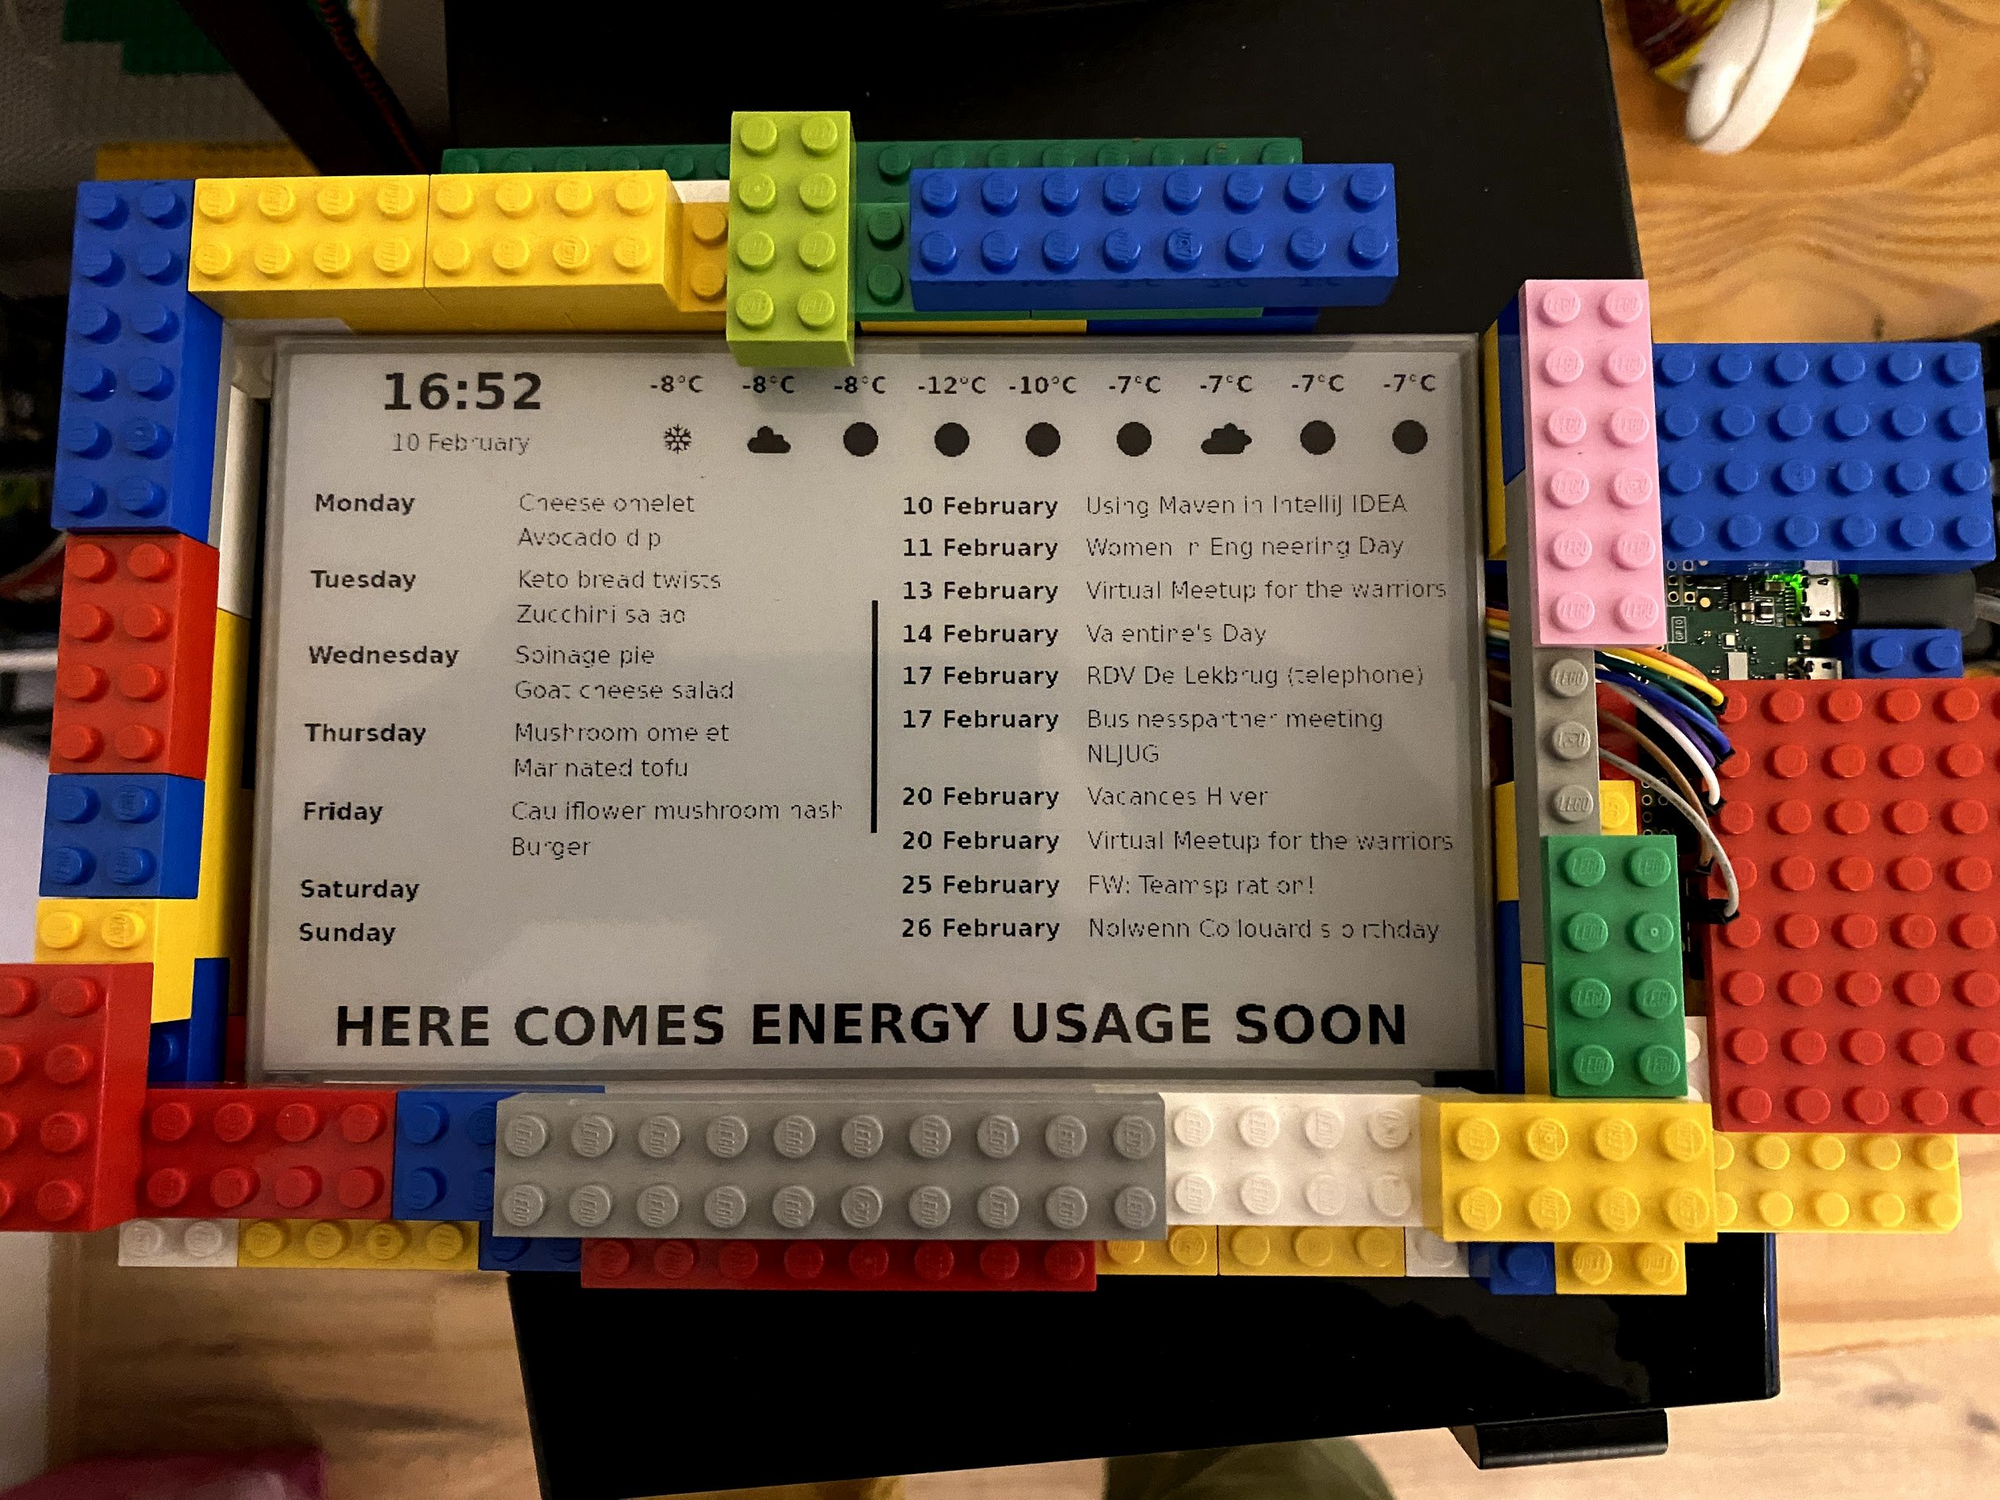
- Resolution. e-ink screen of higher resolution are still quite expensive (compared to a tablet). Depending on what you want to do with the screen, you might end up with artifacts. A nice font will help you there, but it won't do miracles either. For example, this is what my dashboard looked like before I put my text in bold. You can clearly see the artifacts :
- Gray levels. My screen is two colors ( essentially, ink or no ink). Some other screen have 16 gray levels. Some others even have color. You may want to choose one of those but remember that it will cost you in refresh time or price.
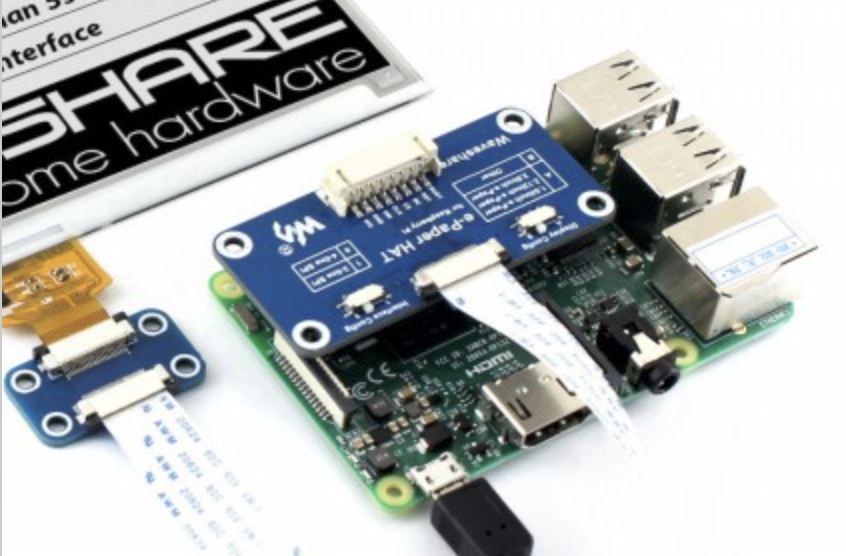
- Driver board. We'll talk more about this soon but be aware that not all screen come with connectors and a driver board. If you don't know what I am talking about, be careful buying a HAT version, otherwise you won't be able to use the screen :
The 'computer'
This post will be using a Raspberry Pi. Note that the Waveshare screens have a pretty extensive documentation so you can also go for Arduino or even the Jatson nano if you fancy it.
Just to be clear, I am using a Raspberry Pi Zero W in my build, so you don't need crazy amounts of power to run it.
If you're afraid of soldering, I recommend you use the B version of the Raspberry because the driver board from Waveshare can directly clip on the GPIO :
As I mentioned, I decided to go for a Raspberry Pi Zero W for two reasons :
- The form factor is much smaller, which allows for a super small setup together with the screen
- The Zero goes for 10$, which is close to nothing!
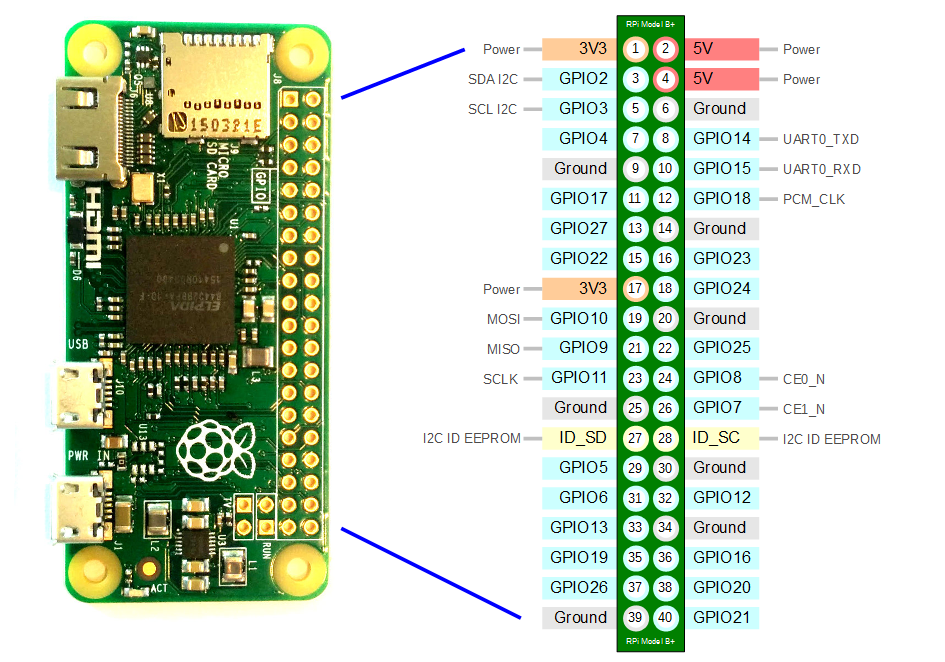
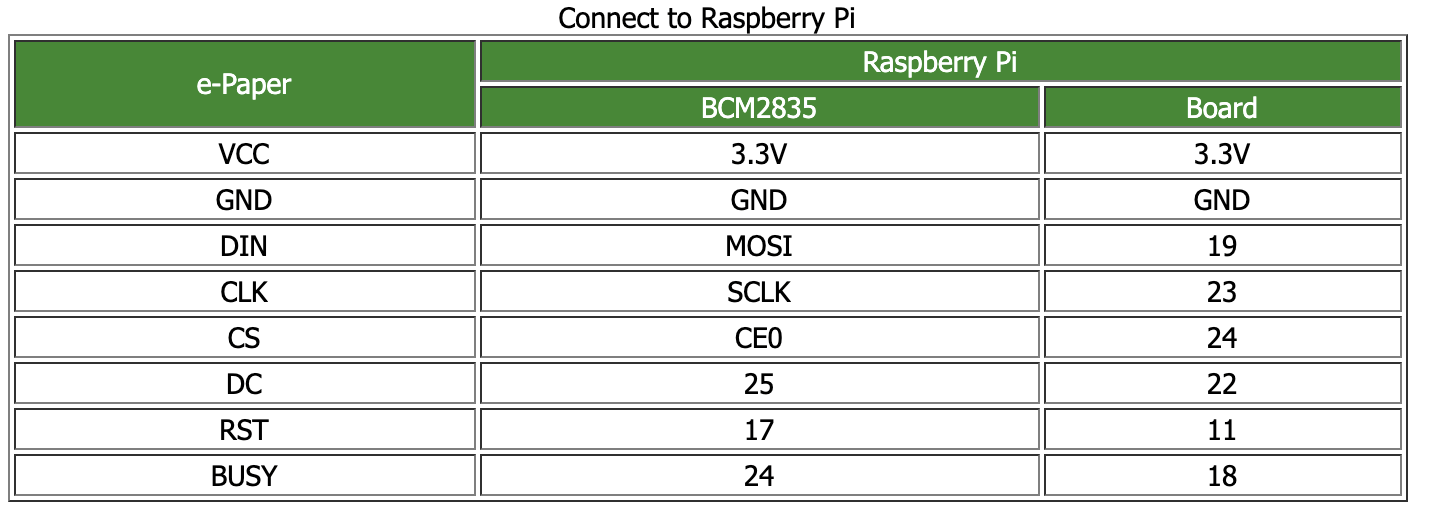
In case you go for the 0 like me, you'll have to solder a few cables. Don't be afraid though, everything is described here. All you need is the table below together with the Raspberry GPIO.
Once you've done that, you're pretty much good to go! Find a 5V adapter and power up your Raspberry Pi! The nice thing is that your screen will feed off the Raspberry so you need only one alimentation. We're ready to move to phase 2!
The OS
I've decided to keep this in the hardware part, because I don't have much to say. What we will want to do on our Raspberry Pi is install a default OS that is not too old. You can create and flash one here by following the instructions.
The next thing you want to do is follow all the instructions described in the default Waveshare setup. Again, they are very well done so I don't have much to add but if you have any issue feel free to drop me a message.
In case you need to setup WiFi for your Raspberry Pi, here is the guide I used!
You will enable SPI, install the necessaries libraries and download the library and test code from Waveshare. I tested with Python.
In case you have the same screen as I do, you will want to run the epd_7in5_V2_test.py script located in waveshare/e-Paper/RaspberryPi_JetsonNano/python/examples/! If all goes according to plan and you've soldered everything correctly, your screen will wake up!
The software
TL;DR: Use epaper.js on the Pi, created a service around it and serve static content in the static folder :).
Our screen is awake, and we have a linux to work with! Time to start creating our dashboard!
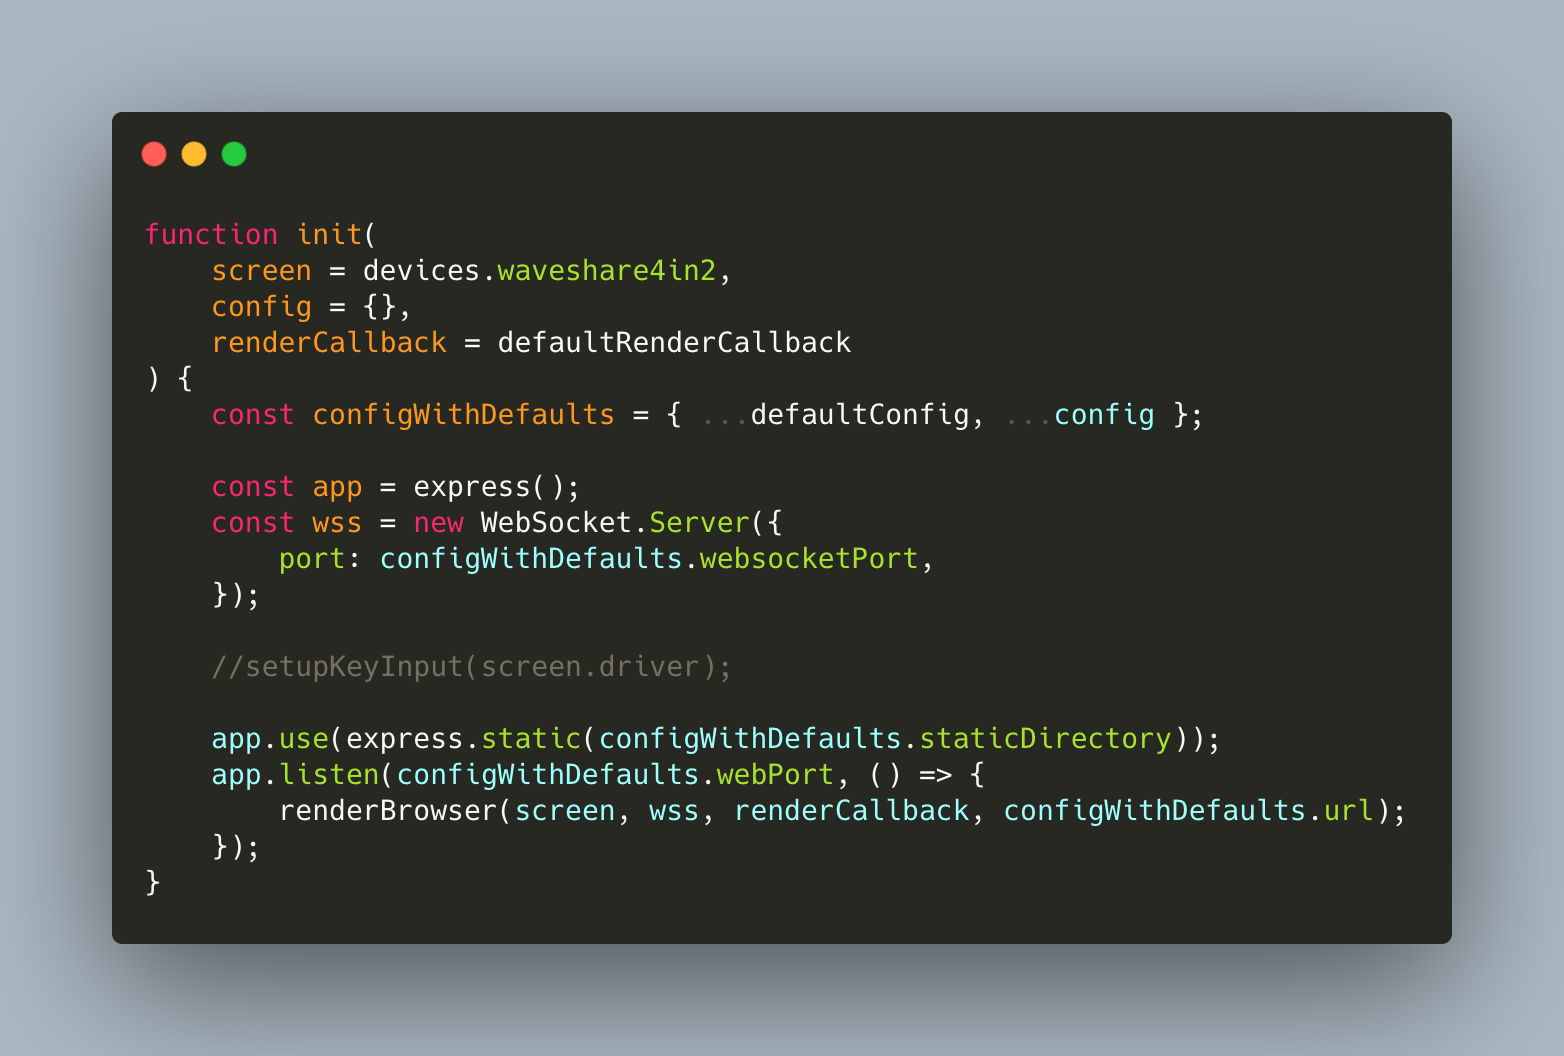
I have made use of the amazing epaper.js project to create my dashboard. The project is insanely useful. In short, it runs a static website locally and projects it on the screen using puppeteer.
This has a huge advantage : you only have to create a website and then deploy it on the device! You can find the complete code for the front and back end of the project here on Github. And the website is available at any time on Netlify.
The project is composed of two parts, which live in the same repository.
- The root repository that contains the code that will run on the Raspberry Pi, 'the backend'
- The
epaper-uifolder, which will contain our actual dashboard, the 'frontend'.
Let's dive into each of the parts, but first, a word of warning:
Epaper.js can only be run on the raspberry. Indeed, it depends on native libraries (the GPIO drivers) that do not exist on your computer :). Not a problem, just something to be aware of (For example, don't set a CI on your project on Github).
Conversely, the latest version of Node that I could run on my raspberry is version 10.x, which means that I could not run the frontend code on it. Again, not a problem; just something to be aware of.
What that means is simply that I have been developing the frontend on my computer, and the backend only on the pi.
Now that it's clear, let's go!
The frontend
This part is the easiest to talk about. Keep in mind that for your own project, you can use any technology that suits you. The only requirement you have is that the result of your build lands in the static folder of the repository to be picked up by the backend.
Here is the current deployed frontend :
I decided to use Web Components, and my website is based on top of LitElement and TailwindCSS. I used the excellent open-wc library to generate my project skeleton in Typescript. Those are personal choices, you may well choose anything you like.
I picked these because by using Web Components I had very little to learn on top of the basic capabilities of HTML. Thanks to tailwind I also didn't have to learn much CSS :). My knowledge is limited in the front-end, having a simple syntax, a boring technological choice and no build-chain seemed like a perfect deal. No need to screw around with Webpack <3!
Another good thing is that because I am basically only building a website, I could use Netlify as a platform to see the results of my work. And gosh I love their product!
Some things to note :
- I wrote a short article on how to easily use tailwind together with LitElement
- Since it is a personal dashboard, I needed personal data. I leave it up to you to decide where to fetch your data from. The easiest for us to sync up with the girlfriend is Google Spreadsheets :). I wrote a whole blog post about how to do that to sync calendars and avoid having to use Oauth2. In short, you can publish your spreadsheets online as CSV files. I do that and then ingest the data to create my dashboard. The great thing is that the CSV files are always up to date!
I created my whole dashboard by using $ npm start in the epaper-ui folder, running $npm build every time I was happy with the result. That pushed the built version in the static folder of my project and sent it over to Github. By pulling the repository on my raspberry, I can make sure to always have the latest version of the dashboard.
Again, you can check the source code here, and the resulting dashboard over here.
One last thing I want to mention before moving on is the way I refresh my dashboard :). The epaper.js examples has an example with data that updates. However, that data updates from the backend to the frontend. In my application, all the data is pulled from the internet via the frontend, which means that I cannot use the same mechanism.
To solve this problem, I make use of a very old capability of HTML itself to tell the page to refresh itself after very few minutes :
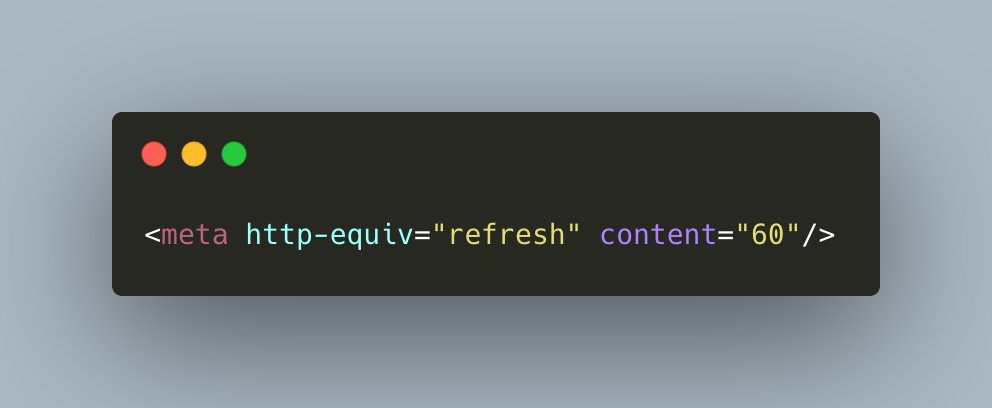
Depending on how you build your own dashboard, you may not be concerned by this.
The backend
Naming that part 'the backend' makes it seem like I've done a whole lot of work but I've really only been piggybacking on the great work done by epaper.js.
Let me show you the integral content of my 'backend' code :
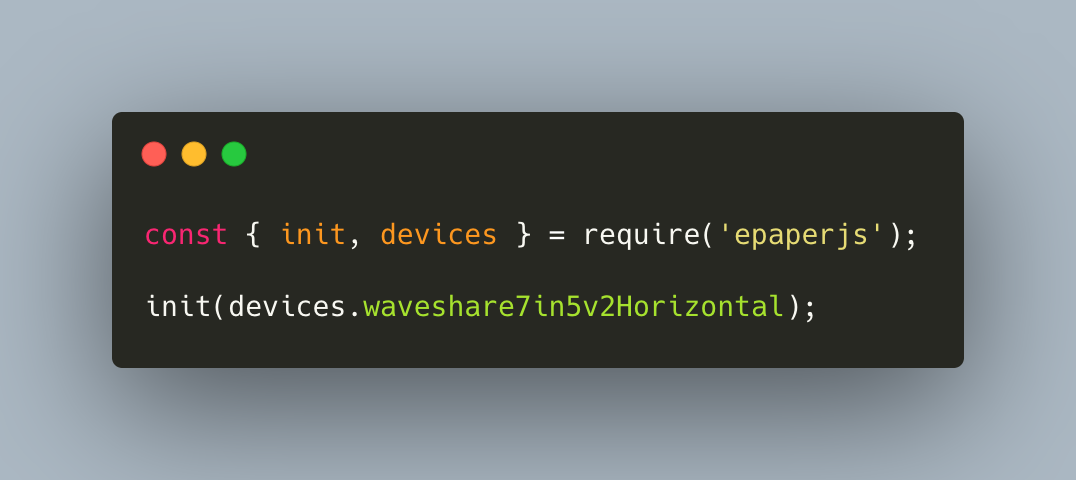
Yep, the only thing I did was call the epaper.js library and pick the device I am using. (Be careful, in case you use another model of Waveshare display you will have to change that value).
That is enough for the content of the static folder to be successfully displayed on the screen :).
Now, you might be expecting a few more things coming up. And you'd be right...
The first time I ran my dashboard ( $node index.js ) and logged off the SSH connection, I got a little surprise : the application stopped. Of course, I had to run it in the background.
However, it is not directly possible, because epaper.js supports stdin inputs (for buttons or keyboards). I looked around and decided to comment out the lines of code that handle stdin :). To do this, you can go on your clone of the project on the raspberry and in node_modules/epaperjs/index.js. You want to comment out the following line in the init function:
There are cleaner ways, but that works for now.
Once that works, the next thing to do is to make it start automatically at boot of the raspberry. I have created a service for that. It comes in two parts:
- the
dashboard.jsfile in the root of the project. - the
dashboard.servicefile in the service folder of the project. To activate it, you want to follow the typical way to create a new service Linux. (careful, you want to make sure that the location of dashboard.js in the file is correct for your system!).
Et voilà! Your dashboard now runs automagically on boot of the raspberry and can be started and stopped on demand.
Additional thoughts and remarks:
- One thing that got me a few times is that an e-paper screen literally works by projecting ink on the screen. Once the ink is there, it won't go way by itself. This means that even when the raspberry is off, the data sticks to the screen. I got tricked a few times by this :).
- Depending on the resolution of your screen, you may see artifacts on the screen. Choosing a newspaper font can help there. There is a good Reddit thread about this.
Overall, I'm extremely happy about the result of this side project and the choices I've made. Picking epaper.js, open-wc and tailwind has helped tremendously to iterate fast and be productive. Having a simple website that I can work with and deploy on Netlify at any time has been a tremendous help.
It was also great fun to build this project with the family. The gilfriend was responsible of the design of the dashboard as well as the data, I built it while my 4 year old did the casing.
Because I don't need the interactions capabilities of epaper.js, I probably could get rid of the websockets altogether in the project and pull the website directly from the web instead of running it locally. That would be very interesting, because then I would automatically get the latest version of the dashboard every time I push a new version to Netlify. To be continued....
Take care! If you have thoughts or questions, you can find me on Twitter.